

H2 Biology Microscope Practical: Optical Microscope Guide
An optical microscope lets you find a specimen, see fine detail and, with a calibrated scale, measure it. To use what you see, you need to know how a distance in the view relates to the real specimen.
The 2026 H2 Biology syllabus 9477 says candidates may be asked to use a light microscope, mount slides and use an eyepiece graticule and stage micrometer (page 12). Its apparatus list includes 4-, 10- and 40-power objectives (page 23). Go by the controls on your own microscope and the task instructions.
What each part of the microscope does
The objective makes an enlarged image of the specimen, and the eyepiece enlarges that image again. The stage holds the slide and moves it. The focus knobs change the distance between the objective and the slide. The light and diaphragm affect how much detail you can see. An eyepiece graticule is a scale of divisions inside the eyepiece. Its divisions have no fixed size in micrometres until you calibrate them.
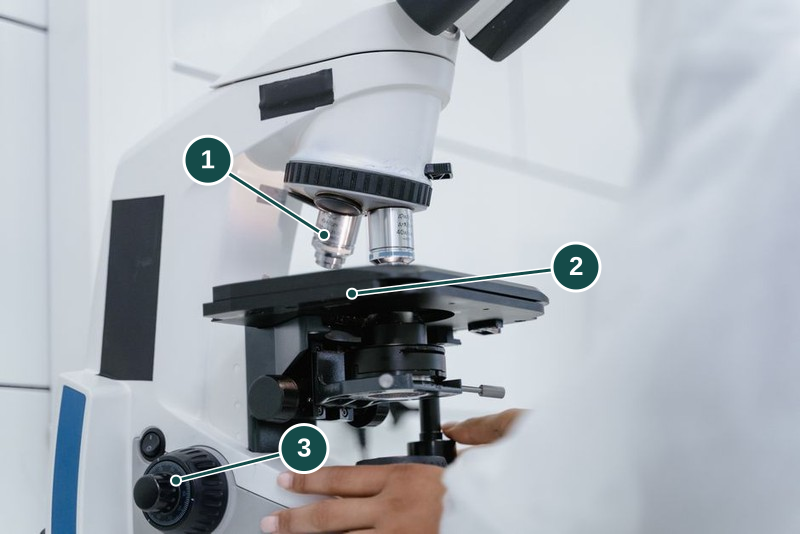
- Objective lens. Magnifies the specimen. Keep it clear of the slide, as your trainer shows you.
- Stage. Holds the slide under the objective and moves it into position.
- Focus knobs. Bring the specimen into focus. Learn which way yours turn.
Illustrative photo: Tima Miroshnichenko on Pexels.
With a 10-power eyepiece and a 10-power objective, total magnification is 100. That tells you how much bigger the image is, not the specimen's real size or whether two close features look separate. That second ability is resolution. Past a certain point, more magnification only makes a blurry image bigger without showing more detail. Leica calls this empty magnification.
Finding the specimen without damaging the slide
Before you focus, ask your trainer which knob moves the stage or objective, and which way moves them apart. Another microscope may move the other way. Check that your slide is not cracked and is held in place the way you were shown.
Start with the lowest-power objective you are allowed. It shows a wider area, so the specimen is easier to find, and it sits further from the slide, so there is more room before the lens can touch it (University of Wisconsin botany notes). Watch from the side while you bring the lens close, then focus as you were shown.
Centre the part you want before you switch to a higher power. A higher-power objective shows a smaller area around the centre, so anything off-centre drops out of view. Watch that the next lens clears the slide as it turns into place. At higher power, use only the fine focus. The lens is now very close to the glass, and Leica's objective guidance warns that coarse focusing at high power can crack the cover glass or slide and damage the front lens. Do not force a knob to chase a blurred image.
Whether an objective needs immersion oil depends on how it was designed, not on its magnification. Leica warns that oil can seep into and damage objectives not made for it, so never add oil unless your trainer says that objective takes it.
Stop if the lens is about to touch the slide, the slide moves or a knob is stiff. The lab safety briefing applies to microscope work too.
When the view is dark or blurred
Is the field empty, dark, or blurred? Tell your trainer what you see, which objective you are on and whether the problem started after a change. That helps far more than "the microscope does not work".
Leica's image-quality guidance checks the settings and the specimen before blaming dirty lenses. A hazy view does not show where the dirt is, or that a lens needs replacing. Make only the adjustments you were shown.
If the view through the eyepiece is sharp but a photograph is blurred, record both. Florida State University's microscopy primer explains that the eye and the camera can be focused differently. Its camera and repair procedures are for specialists, not instructions for your lesson. Ask your trainer to check the camera setup before you change the specimen. A blurred photo alone does not show the objective is damaged.
What staff handle
Before the group starts, your trainer checks the slides, which objectives you may use, the clearance, the light and the calibration equipment. You need to know how to focus and when to stop. If you hand the microscope to someone else, tell them the specimen, the objective and eyepiece in use and any problem you had.
Trained staff clean the inside of the microscope and replace parts, following the maker's procedure. Do not use a cleaning fluid just because it worked on another lens. A replacement part can also change the calibration.
NUS's microscopy core trains its users in every stage, from specimen preparation through to image analysis, which shows microscopy as one complete measurement task. That does not make a school microscope the same as its research systems.
Calibrating the eyepiece graticule
A stage micrometer is a slide with a scale of known length. How much one eyepiece graticule division represents depends on the objective and eyepiece in use. Line up the two scales, and find two points far apart where their marks coincide. Count the spaces between the marks, not the marks themselves: five marks enclose only four spaces.
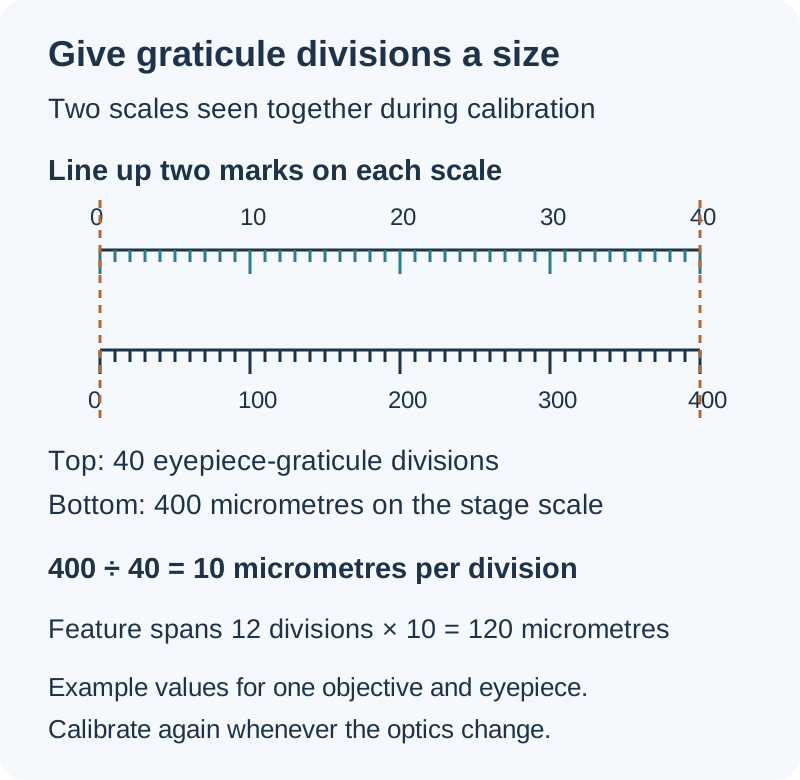
These are example values. Use the scale you are given and the objective and eyepiece you are actually using.
In this example, 40 graticule divisions span 0.4 mm, or 400 micrometres:
- Value per graticule division: 400 divided by 40 = 10 micrometres.
- A feature spanning 12 divisions: 12 multiplied by 10 = 120 micrometres.
Nikon's calibration tutorial explains this comparison. A calibration holds only for the objective, eyepiece and any other optical setting you used. Nikon notes that even two objectives with the same label can differ by a few percent, so each one is measured separately. After any change, calibrate again. The graticule looks exactly the same, but each division now covers a different length of specimen.
Now suppose you switch to a different objective. The same feature now spans 24 divisions, and the new calibration is 5 micrometres per division. Its length is still 120 micrometres: 24 multiplied by 5. The count doubled because each division now covers half the length. Reusing the old factor would wrongly give 240 micrometres.
The feature looks bigger in the new view, but its real size has not changed. Without the factor for your objective, eyepiece and other optical settings, a division count alone cannot give you a size.
Record the two scales, the objective and eyepiece, the lined-up span, the number of spaces, the factor and the units. Recalibrate and repeat checks as you are told. The calibration itself, how well the scales line up and how consistently you judge where a feature's edges are all affect the uncertainty. Reading to half a division does not tell you how accurate the instrument is.
Drawing what you see
Draw what the task asks for: a tissue plan and a detailed cell drawing answer different questions. Show visible boundaries in the right positions relative to each other, with clear lines and labels that point to identified structures.
Record the specimen name you were given and the plane of the section. Draw only what you can see. Do not add an organelle just because the textbook cell has one. If a feature is blurred or incomplete, say so instead of inventing its outline.
For a scale bar, use your current calibration and the size of your drawing. Drawing magnification is drawn length divided by actual length, in the same units. It changes if the drawing is resized, so the microscope's magnification cannot give you this number.
Estimating size and density from the field of view
The width of the field of view gives only a rough size. Four equal-width cells exactly filling a calibrated 1.8 mm diameter would each span 0.45 mm. Unequal widths and cells cut off by the edge make this rough. Measure directly with the calibrated graticule when the task asks for it.
For density, use the counting rule and sample area you are given. A count from one field describes that field only; other parts of the specimen may differ. The stomatal-density practical works through field area, sampling and comparison questions.
Cleaning and putting the microscope away
Use only the cleaning materials and method approved for that lens and that kind of dirt. Leica's cleaning guidance warns that abrasive materials, including paper, can scratch lens surfaces, and that some solvents attack the coatings on the lens. Do not use a sleeve, ordinary tissue or your own solvent.
Switch off and shut down the microscope, return slides and store it, all the way your trainer shows you. Report cracked glass, stiff knobs or a dirty lens before anyone uses it again. Do not repair or take apart any part of the microscope yourself.
Continue with the H2 Biology practical guide for the wider preparation sequence and the practicals hub to choose the next investigation.
Sources
- https://www.microscopyu.com/tutorials/reticlecalibration
- https://www.leica-microsystems.com/science-lab/microscopy-basics/immersion-objectives/
- https://www.leica-microsystems.com/science-lab/microscopy-basics/how-to-clean-microscope-optics/
- SEAB Biology (Syllabus 9477) GCE A-Level 2026
- https://www.leica-microsystems.com/science-lab/microscopy-basics/what-is-empty-magnification/
- https://botit.botany.wisc.edu/botany_130/microscope/procedure.html
- https://micro.magnet.fsu.edu/primer/photomicrography/errors.html
- https://www.mbi.nus.edu.sg/services/microscopy-core/
Save or continue learning
Want supervised lab practice?
Explore practical lessons, with timings, fees, and locations on the programme page.
View H2 Biology Practicals (Labs & Experiments)