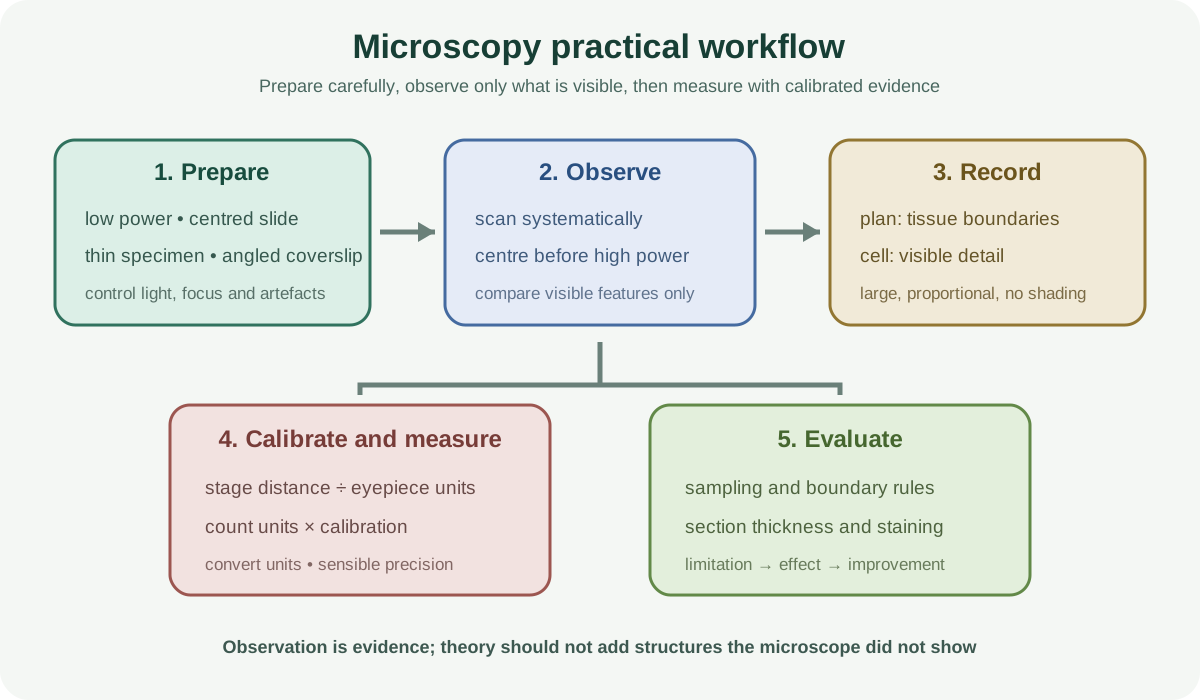
Microscopy, Biological Drawings and Calibration develops the light-microscope skills assessed in Cambridge International Biology 9700 Paper 3. It covers microscope setup, temporary slides, plan and cell drawings, observable comparisons, calibration, actual-size calculations and sampling. Related cell and tissue concepts belong in the theory hub; this note concentrates on what to do, record and justify under practical assessment conditions.
1. Set up the microscope systematically
Carry the microscope securely and place it on a stable bench. Begin with the low-power objective. Lower magnification gives a wider field of view, making the specimen easier to locate. Place the slide on the stage, centre the specimen over the light path and secure it.
Looking from the side, bring the objective close to the slide without touching it. Then look through the eyepiece and focus by increasing the distance between objective and slide. Adjust illumination and diaphragm to obtain contrast rather than maximum brightness. Centre the target before changing to high power because the high-power field is smaller.
Use fine focus at high power. Never force controls or allow an objective to strike the slide. If the image disappears, return to low power and relocate it instead of searching blindly at high power.
2. Prepare a temporary slide
Place a thin specimen in a drop of suitable liquid or stain on a clean slide. A thick specimen produces overlapping structures and poor transmission of light. Lower a coverslip at an angle using a mounted needle so air is pushed ahead of the edge rather than trapped beneath it.
Blot excess liquid carefully without drawing the whole specimen from under the coverslip. Use the specified stain and follow its hazard precautions. Cutting tools and glass can cause injury, so cut away from fingers, use a suitable surface and dispose of damaged slides safely.
A temporary preparation should preserve the feature being studied. Crushing cells, allowing tissue to dry or using excessive stain can create artefacts that are not genuine biological structures.
3. Make a plan diagram
A plan diagram shows the distribution and relative proportions of tissues. Draw clear outlines of tissue regions but do not draw individual cells. Use a large proportion of the available space, a sharp pencil, single unbroken lines and no shading.
Observe first, identify the major boundaries and then draw them in proportion. A thick region should appear thicker than an adjacent thin region. Labels should identify tissues only when requested or confidently recognised, with straight ruled label lines that do not cross.
Plan drawings are not artistic impressions. Their value lies in accurate proportions, boundary shapes and organisation. Do not invent a complete circle when only part of a specimen is visible.
Check this topic from memory
Attempt the matching topic bank before reopening the notes. Use each missed idea to decide what to review next.
A cell drawing shows observable cells and their contents. Draw correct cell shapes, relative sizes and positions. Plant cell walls are drawn with two lines; where two cells touch, the adjacent walls can require three lines in total. Include only organelles or contents actually visible with the light microscope.
Do not draw a textbook chloroplast, nucleus or vacuole merely because theory predicts it. Avoid shading, sketching, colour and repeated scratchy lines. A few well-observed cells drawn large and accurately are better than many tiny symbolic cells.
The title or accompanying text should identify the specimen and magnification context where requested. Labels must point precisely to the visible feature.
5. Compare specimens using observations
Cambridge can ask for similarities and differences between a slide and a photomicrograph or between two specimens. Use paired comparative statements: “A has..., whereas B has...” Quantify where possible, such as relative thickness, number of layers or measured cell dimensions.
Restrict the comparison to observable features. A thick wall may be visible; “contains lignin” is an inference unless a test or supplied information supports it. Do not explain differences when the command asks only to compare.
Systematic scanning prevents cherry-picking. Compare overall shape, tissue distribution, boundary thickness, cell shape, relative size and visible contents in a consistent order.
6. Understand magnification and actual size
Magnification is image size divided by actual size. Rearranging gives actual size as image size divided by magnification. Convert units before calculation: one millimetre equals one thousand micrometres.
Measure the image with a ruler at the widest specified dimension. Follow the line named in the question rather than choosing a more convenient one. Write the measured image length, conversion, substitution and final unit. A plausible numerical answer with no working may lose reasoning marks.
A scale bar travels with an enlarged or reduced image, while a printed magnification may become invalid if image size changes. Whenever possible, use the scale bar directly.
7. Calibrate an eyepiece graticule
An eyepiece graticule has arbitrary divisions and must be calibrated against a stage micrometer with a known scale. Place the stage micrometer on the microscope and align the two scales. Find two points that coincide as far apart as possible.
Divide the known stage-micrometer distance by the number of corresponding eyepiece divisions. This gives the actual length represented by one eyepiece unit at that objective magnification. Replace the stage micrometer with the specimen, count the eyepiece units spanning the feature and multiply by the calibration value.
Calibration changes when the objective changes. Record a separate value for each objective used. Aligning over a long distance reduces the percentage effect of judging one boundary inaccurately.
8. Estimate numbers by sampling
The syllabus can require estimating cells or organelles in an area using grids or fields of view. Define a counting rule before starting, such as counting objects touching the top and left boundaries but not bottom and right. This prevents double counting.
Select fields by a systematic or random method rather than choosing unusually dense areas. Count several fields, calculate a mean per field and scale to the total number of equivalent fields when appropriate. State assumptions, including that sampled fields represent the whole area and that the preparation has reasonably uniform thickness.
More fields reduce random sampling variation. They do not correct a biased choice of fields or inconsistent boundary rules.
9. Precision, uncertainty and records
Record raw measurements to the precision supported by the ruler, graticule or scale. Keep units in table headings, not repeated in every cell. Use consistent decimal places for repeated measurements made with the same instrument.
Calculated values should normally use the same number of significant figures as, or one more than, the least precise data used. Do not imply unrealistic precision by retaining a long calculator display.
Record unusual features rather than silently changing them. A folded tissue, trapped bubble or damaged region may explain an anomalous measurement and should guide whether a repeat is required.
10. Evaluate a microscopy method
Identify the dominant limitation and its effect. A thick section can make boundaries overlap, causing uncertain tissue measurements. An improvement is to prepare a thinner section with a supported cutting method and repeat across several sections.
Uneven staining may hide organelles in some fields. Standardising stain concentration and exposure time improves comparability. Calibration across too few graticule units increases proportional reading uncertainty; matching widely separated divisions improves accuracy.
Avoid vague improvements such as “use better equipment.” Name the replacement, the error it reduces and how it changes the evidence.
Worked application: calibration and actual cell size
At one objective, 50 eyepiece divisions align with 0.20 mm on a stage micrometer. Convert 0.20 mm to 200 micrometres, then divide by 50, so one eyepiece division represents 4.0 micrometres. A cell spanning 18 eyepiece divisions therefore has an estimated length of 72 micrometres. The result applies only at that calibrated objective and should include the correct unit. To improve confidence, align the two scales across a long distance, repeat the alignment independently, measure several representative cells and report the mean and variation rather than selecting the largest cell in the field.
Common misconceptions and corrections
Starting at high power. Low power gives a wider field for locating and centring the specimen.
Focusing by moving the objective blindly toward the slide. Approach while viewing from the side, then focus away.
Using maximum light automatically. Contrast, not brightness alone, determines visibility.
Dropping a coverslip flat. Lowering it at an angle reduces trapped air.
Treating bubbles as cells. Bubbles are preparation artefacts.
Drawing cells in a plan diagram. A plan diagram shows tissue regions only.
Shading a biological drawing. Use clear single lines without shading.
Inventing invisible organelles. Draw only observed structures.
Drawing plant walls as one line. Show visible wall thickness with paired lines.
Writing unpaired comparisons. Directly compare A with B.
Replacing observation with explanation. Observable features come first.
Using mixed units in magnification calculations. Convert before dividing.
Assuming printed magnification survives image resizing. A scale bar is safer.
Treating graticule divisions as micrometres. They are arbitrary until calibrated.
Using one calibration for every objective. Recalibrate after changing objective.
Calibrating over one tiny interval. A longer alignment reduces percentage reading error.
Counting every boundary object. Use a consistent inclusion rule.
Choosing the densest field. Use representative systematic or random sampling.
Giving excessive significant figures. Match precision to the input measurements.
Calling a thicker section more accurate. Overlap can obscure boundaries.
Assessment guidance
Paper 3 rewards observable accuracy and disciplined presentation. For setup, give a safe ordered sequence and explain why low power comes first. Distinguish plan diagrams from cell drawings, preserve proportions and avoid shading. In calculations, show measurement, unit conversion, substitution and a sensible final precision. A calibration answer must connect stage distance, eyepiece divisions and the exact objective. Comparisons should be paired and observable. Evaluation earns credit when each named limitation has a likely effect and a specific improvement. Repeats matter only when you explain how a mean, range or sampling estimate will use them.
Retrieval practice
Rehearse a safe microscope setup from a blank bench. Prepare a temporary slide and list three artefacts. Draw the same specimen once as a plan and once at cellular detail. Complete magnification, scale-bar and graticule calculations with unit conversions. Design a boundary rule and sampling scheme for estimating organelle number. Finish by converting five vague evaluation statements into limitation-effect-improvement chains.